Difference between revisions of "Creating our first button in CS"
(→Subscribing to the button's events) |
(→Creating a button) |
||
| (14 intermediate revisions by the same user not shown) | |||
| Line 3: | Line 3: | ||
== Prerequisites == | == Prerequisites == | ||
We recommend you go through [[A 'hello world' CS program|A 'hello world' C# program]] before going into this example. | We recommend you go through [[A 'hello world' CS program|A 'hello world' C# program]] before going into this example. | ||
| − | |||
== Creating a button == | == Creating a button == | ||
| − | * Add a new class to [[Creating a new project in CSharp|your project]] and name it | + | * Add a new class to [[Creating a new project in CSharp|your project]] and name it MyCustomUI2 |
* Add the following code to your class | * Add the following code to your class | ||
<syntaxhighlight lang="csharp" line> | <syntaxhighlight lang="csharp" line> | ||
| − | // Namespaces of the two | + | // Namespaces of the two Ribbon Commander assemblies |
| − | using | + | using IlydaUK.Interop.RibbonCommander; |
| − | using | + | using IlydaUK.RibbonCommander.Core; |
| − | namespace | + | namespace RibbonCommanderAddin |
{ | { | ||
class MyCustomUI2 | class MyCustomUI2 | ||
| Line 49: | Line 48: | ||
* Modify class ThisAddin in ThisAddin.cs as follows | * Modify class ThisAddin in ThisAddin.cs as follows | ||
<syntaxhighlight lang="csharp" line> | <syntaxhighlight lang="csharp" line> | ||
| − | namespace | + | namespace RibbonCommanderAddin |
{ | { | ||
public partial class ThisAddIn | public partial class ThisAddIn | ||
| Line 71: | Line 70: | ||
*: [[image: CSFirstButton.png|link=]] | *: [[image: CSFirstButton.png|link=]] | ||
| − | == Code Analysis == | + | == Code Analysis I == |
<syntaxhighlight lang="csharp" line start="22"> | <syntaxhighlight lang="csharp" line start="22"> | ||
// Add a new group to the tab and label it | // Add a new group to the tab and label it | ||
| Line 130: | Line 129: | ||
</syntaxhighlight> | </syntaxhighlight> | ||
* Notice that we need to make the button a member of our class in order to subscribe to its events | * Notice that we need to make the button a member of our class in order to subscribe to its events | ||
| + | * The .NET framework makes it easy to [[Inserting Events Stubs in CS|insert event stubs]]: | ||
| + | *# type <code>_myButton.OnActionEvent +=</code> | ||
| + | *# intellisense picks up and prompts you to press tab to insert the stub: | ||
| + | *#: [[image:InsertingEventStubCS.png|border|link=]] | ||
| + | *# Press tab twice to insert the delegate stub and change it to display the message box as above | ||
| + | * If everything went according to plan the button will now display the following message when clicked: | ||
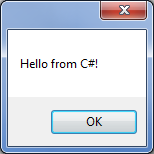
| + | *: [[image: FristButtonCSMsgBox.png|link=]] | ||
| + | |||
| + | == Code Analysis II == | ||
| + | <syntaxhighlight lang="csharp" line start="24"> | ||
| + | _myButton.OnActionEvent += _myButton_OnActionEvent; | ||
| + | </syntaxhighlight> | ||
| + | [[rxButton]] has a number of [[rxButton#Events|events]] you can subscribe to. Here we subscribed to the button's 'onAction' event which fires when the button is clicked. | ||
== Remarks == | == Remarks == | ||
| − | |||
| − | |||
| − | |||
| − | |||
| − | |||
| − | |||
| − | |||
| − | |||
| − | |||
| − | |||
| − | |||
| − | |||
| − | |||
| − | |||
| − | |||
| − | |||
| − | |||
| − | |||
| − | |||
| − | |||
| − | |||
| − | |||
| − | |||
| − | |||
| − | |||
| − | |||
| − | |||
| − | |||
| − | |||
| − | |||
Latest revision as of 11:35, 21 October 2013
Contents
Prerequisites
We recommend you go through A 'hello world' C# program before going into this example.
Creating a button
- Add a new class to your project and name it MyCustomUI2
- Add the following code to your class
// Namespaces of the two Ribbon Commander assembliesusing IlydaUK.Interop.RibbonCommander;
using IlydaUK.RibbonCommander.Core;
namespace RibbonCommanderAddin{class MyCustomUI2{private rxCustomUI _customUI;
public MyCustomUI2()
{// Instantiate a new rxCustomUI in a new context with id 'my_test_cs_ctx'_customUI = rxCustomUI.create("my_test_cs_ctx", "Test C# Context");
_customUI.clear();
// Add a new tab and label itrxTab myTab = _customUI.ribbon.tabs.add(new rxTab());
myTab.label = "My C# Tab";
// Add a new group to the tab and label itrxGroup myGroup = myTab.groups.add(new rxGroup());
myGroup.label = "My C# Group";
// Add a new button to the group and label itrxButton myButton = myGroup.buttons.add(new rxButton());
myButton.label = "Click Me!";
// Render the UI_customUI.refresh();
}}}
- Modify class ThisAddin in ThisAddin.cs as follows
namespace RibbonCommanderAddin{public partial class ThisAddIn
{private MyCustomUI2 _myCustomUI;
private void ThisAddIn_Startup(object sender, System.EventArgs e)
{// Show the custom ribbon_myCustomUI2 = new MyCustomUI();
}private void ThisAddIn_Shutdown(object sender, System.EventArgs e)
{}}}
- Run the add-in. If everything went according to plan a new tab labeled 'My C# Tab' will appear when the application starts and it will contain a button labeled 'Click Me!' in a group labeled 'My C# Group':
-

Code Analysis I
// Add a new group to the tab and label itrxGroup myGroup = myTab.groups.add(new rxGroup());
myGroup.label = "My C# Group";
Each rxTab object has a collection of rxGroup objects (accessible through its groups property). Here we add a new group to our tab's groups and label it 'My C# Group'
// Add a new button to the group and label itrxButton myButton = myGroup.buttons.add(new rxButton());
myButton.label = "Click Me!";
Each rxGroup object has a collection of rxButton objects (accessible through its buttons property). Here we add a new button to our group and label it 'Click Me!'
Subscribing to the button's events
At the moment the new button isn't of much use as it does nothing when clicked. In this section we will subscribe to the button's onAction event and display a message box when clicked.
- Update the class as follows.
class MyCustomUI2{private rxCustomUI _customUI;
private rxButton _myButton;
public MyCustomUI2()
{// Instantiate a new rxCustomUI in a new context with id 'my_test_cs_ctx'_customUI = rxCustomUI.create("my_test_cs_ctx", "Test C# Context");
_customUI.clear();
// Add a new tab and label itrxTab myTab = _customUI.ribbon.tabs.add(new rxTab());
myTab.label = "My C# Tab";
// Add a new group to the tab and label itrxGroup myGroup = myTab.groups.add(new rxGroup());
myGroup.label = "My C# Group";
// Add a new button to the group and label it_myButton = myGroup.buttons.add(new rxButton());
_myButton.label = "Click Me!";
_myButton.OnActionEvent += _myButton_OnActionEvent;
// Render the UI_customUI.refresh();
}void _myButton_OnActionEvent(IRibbonControl control)
{MessageBox.Show("Hello from C#!");
}}
- Notice that we need to make the button a member of our class in order to subscribe to its events
- The .NET framework makes it easy to insert event stubs:
- type
_myButton.OnActionEvent += - intellisense picks up and prompts you to press tab to insert the stub:
-
- Press tab twice to insert the delegate stub and change it to display the message box as above
- type
- If everything went according to plan the button will now display the following message when clicked:
-
Code Analysis II
_myButton.OnActionEvent += _myButton_OnActionEvent;
rxButton has a number of events you can subscribe to. Here we subscribed to the button's 'onAction' event which fires when the button is clicked.